How to Produce an Engraved Northern Star Bracelet with 0.3ct Green Emerald Gemstone – Gold Vermeil
Introduction
The intersection of celestial symbolism and fine jewelry craftsmanship has given rise to one of the most sought-after accessories in contemporary design: the engraved Northern Star bracelet. When executed in gold vermeil (sterling silver heavily plated with gold) and accented with a 0.3-carat green emerald, this piece transcends mere adornment to become a talisman of guidance, purity, and luxury. Producing such a bracelet requires a fusion of traditional goldsmithing, precision engraving, gemstone setting, and electroplating chemistry.
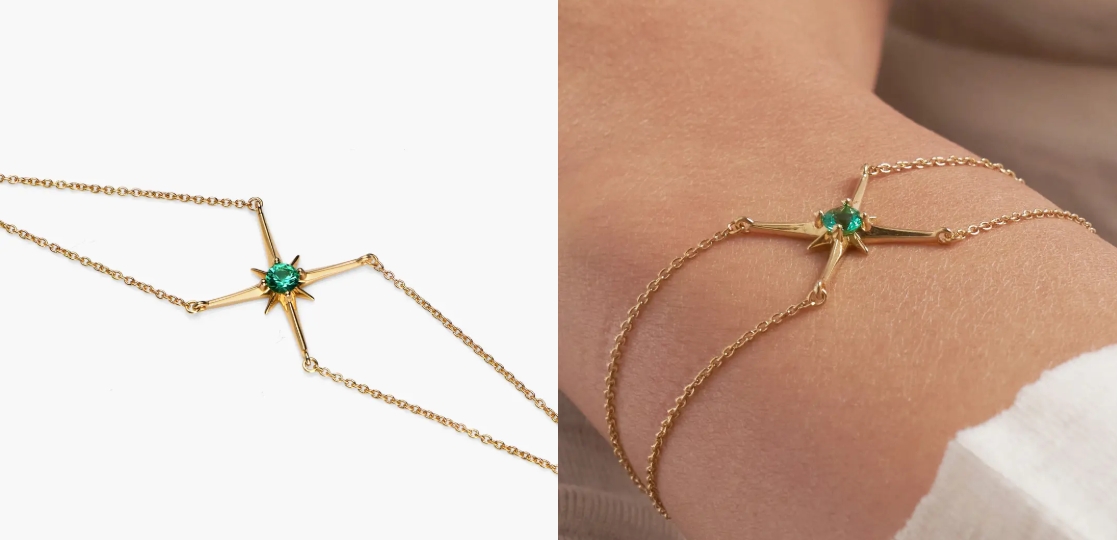
This guide provides a step-by-step technical production protocol for creating a high-quality engraved Northern Star bracelet with a genuine or lab-created green emerald (0.3 ct) in gold vermeil. Total word count: approximately 3,000 words, covering material selection, tooling, fabrication, engraving, setting, finishing, and quality control.
Part 1: Materials and Specifications
1.1 Base Metal Substrate
- Material: 925 sterling silver (92.5% Ag, 7.5% Cu or other alloys).
- Why: Silver provides excellent malleability for engraving, high electrical conductivity for electroplating, and a bright white underlayer that enhances gold brilliance.
- Form: Flat bracelet blanks, typically 3–5 mm wide, 1.2–1.5 mm thick, length adjustable (6–7 inches standard).
1.2 Gold Vermeil Layer
- Definition per US FTC guidelines: Vermeil requires a base of sterling silver with a minimum gold thickness of 2.5 microns (2.5 µm) by electroplating. Fine jewelry standards often use 3–5 µm.
- Gold type: 18K or 14K yellow gold. 18K (75% Au, 25% Cu/Ag) gives richer color and better tarnish resistance.
- Plating thickness: 3 µm minimum for durability.
1.3 Green Emerald Gemstone – 0.3 Carat
- Carat weight: 0.30 ct ± 0.02 ct.
- Dimensions: Typical round or oval faceted cut: ~4 mm diameter (round) or 4×3 mm (oval). Depth ~2.5 mm.
- Quality: Natural emerald is preferred but expensive. Lab-created (hydrothermal) emerald offers identical hardness (7.5–8 Mohs) and color with fewer inclusions, reducing setting risk.
- Color: Medium to deep green, slightly bluish-green. Avoid overly pale or yellowish-green.
- Clarity: Eye-clean or slightly included (natural). Inclusions weaken stone, requiring bezel or prong settings.
1.4 Additional Consumables
- Solder: Silver solder (hard, medium, easy grades) for bracelet construction. Avoid lead-based alloys.
- Flux: Borax-based or liquid flux (e.g., Battern’s).
- Pickle solution: Sodium bisulfate (e.g., Sparex) for removing oxides.
- Polishing compounds: Tripoli (for initial polish), rouge (final high-gloss).
- Electroplating chemicals: Gold cyanide or non-cyanide gold plating solution, conductive silver paint (if needed), rectifier with anode baskets.
- Engraving tools: Gravers (square, flat, round, knife-edge), magnifying optics (2–4×), beeswax or engraving block.
Part 2: Bracelet Pre-Formation and Silver Preparation
Step 1 – Cutting and Shaping the Silver Blank
- Annealing: Heat the sterling silver sheet (22–20 gauge) to 600°C (red glow) then quench in water to soften.
- Marking: Use a divider and scribe to outline bracelet dimensions: length 170–190 mm, width 4–5 mm.
- Cutting: Cut with a jeweler’s saw (2/0 or 3/0 blade). File edges smooth with #4 to #6 cut files.
- Forming: Wrap around a mandrel to create slight curvature (radius ~25–30 mm). For a bangle-style, form full circle; for cuff, leave open ends.
Step 2 – Creating the Bezel or Prong Setting for the Emerald
Option A: Bezel Setting (recommended for emeralds due to protection from chipping)
- Cut a strip of fine silver (999) or 18K yellow gold bezel wire, 0.3 mm thick, height 1.5× the emerald’s height (~3.5–4 mm).
- Form the bezel tightly around the emerald using a bezel mandrel or pusher. Solder the seam with hard silver solder.
- File the bottom edge flat. Solder the bezel to the bracelet surface at the desired location (typically 10–15 mm from the clasp or center).
- Note: Do not place the emerald until after engraving and final polishing.
Option B: Prong Setting
- Drill 4–6 holes at corners of a 4×3 mm oval layout. Cut a bearing seat with a round burr (0.8–1.0 mm depth).
- Fabricate prongs from 20-gauge round wire, solder them onto the bracelet. File prongs to tapered shape.
Step 3 – Soldering the Clasp Mechanism
- For a standard lobster clasp bracelet: Solder a jump ring to one end (with hard solder) and a clasp attachment ring to the other (with medium solder).
- Use a third hand or tweezers to hold parts. Apply flux, place small pallions of solder, heat with a handheld torch (e.g., Smith Little Torch) with a #6 tip.
- Quench in pickle solution for 5 minutes, rinse in water.
Step 4 – Initial Polishing (Before Engraving)
- Sand with 400→600→800→1200 grit wet/dry paper.
- Buff with Tripoli on a sewn muslin wheel (1,400 RPM). Clean ultrasonic in mild detergent. Final prep with rouge on a loose flannel wheel.
- Critical: Do not over-polish near the setting area – maintain metal thickness for engraving.
Part 3: Engraving the Northern Star Design
3.1 Design Transfer and Layout
- Northern Star motif: Typically a stylized eight-pointed star (representing Polaris) often surrounded by concentric circles, crescent moon, or compass lines.
- Transfer method:
- Coat bracelet surface with white acrylic paint or permanent marker (e.g., Sharpie).
- Dry thoroughly.
- Place a laser-printed or photocopied design facedown. Apply acetone or xylene with a cotton swab – the toner will transfer to the painted surface.
- Allow to dry, then lightly scribe over design lines using a carbide scriber.
3.2 Graver Selection and Sharpening
- Primary graver: 120° square graver for straight lines and stippling.
- Flat graver (1.5 mm) for wider cuts and bright cuts.
- Onglette (knife-edge) for fine detail, e.g., star rays.
- Sharpening standard: Use a dual-angle sharpening system (e.g., GRS Power Hone) with 600→1200 grit diamond wheels. Final polish on a ceramic or Arkansas stone.
Ideal angles:
- Face: 45°
- Heel: 15°
- Lift: 10–12° for bold cut; 5–7° for delicate lines.
3.3 Hand Engraving Technique
- Secure the bracelet in an engraver’s block (e.g., GRS BenchMate) filled with Thermo-Loc or pitch.
- Begin with the star center: Use a 0.5 mm flat graver to create a small faceted dot (pavilion). This will later serve as the focal point opposite the emerald or adjacent to it – decide layout: emerald at one end (representing the “earth”) and star at the center, or emerald as the star’s center (requires very shallow engraving around bezel).
- Recommendation: Place emerald at one terminus (near clasp) and Northern Star at the midpoint to avoid interference.
- Engrave the eight rays:
- Four primary rays (N, S, E, W): Cut with a 1 mm flat graver, depth 0.2 mm, length 8–10 mm.
- Four secondary rays (intercardinal): Use a #44 square graver, depth 0.1 mm, length 6 mm.
- Execute a “bright cut” by pushing graver dynamically – this creates a faceted, light-reflecting surface.
- Add a compass ring: Use an onglette graver held at 45° to cut a fine circle around the star. Use a beam compass or circle template as a guide.
- Background texture (optional): Stipple the background with a beading tool or a square graver turned on its point to create a matte finish that contrasts with bright-cut lines.
3.4 Mechanical Engraving (Alternative for Production Runs)
For batches >50 pieces, use a pantograph engraver (e.g., Gravograph IM3) or CNC engraving.
- Tool: 0.3 mm carbide “V” bit or 0.5 mm ball end mill.
- Spindle speed: 15,000–20,000 RPM.
- Feed rate: 200–300 mm/min.
- Depth per pass: 0.05 mm, total 2 passes.
- Then hand-finish with a burnisher to remove burrs.
Part 4: Setting the 0.3ct Green Emerald
4.1 Final Clean Before Setting
- Ultrasonic clean in warm soapy water (avoid harsh chemicals, which can attack some emerald fillers if natural).
- Dry with compressed air.
- Do not steam clean – emeralds are sensitive to thermal shock.
4.2 Bezel Setting Procedure
- Check bezel fit: The 0.3 ct emerald should drop in with 0.1–0.2 mm gap. If too tight, use a bezel expander; too loose, compress bezel with a hammer handpiece.
- Insert the emerald onto a thin bed of epoxy (optically clear, 30-minute cure) if desired for added security. Most jewelers rely on friction only.
- Push the bezel wall over the stone using:
- A bezel rocker (starting at 12 and 6 o’clock, then 3 and 9).
- A nylon or agate burnisher for final smoothing.
- Never hammer directly on the emerald. Always push metal gradually.
- Check stone security: Try to rotate the stone with a wooden stick – should be immobile.
4.3 Prong Setting (If chosen)
- Use a round burr to pre-cut bearing seats slightly shallower than the girdle.
- Place emerald, press prongs down with a prong pusher.
- Cut off excess prong tips with flush cutter, then file and round each tip.
- Final tighten with a bullet burr or cup burr.
4.4 Post-Setting Cleaning
- Remove fingerprints with a soft chamois.
- Avoid pickle solution (acid can damage emerald). Use only mild soap and water.
Part 5: Gold Vermeil Electroplating
Gold vermeil is produced by electroplating gold over the finished sterling silver bracelet. Crucially, the emerald must be masked to prevent gold deposition on its surface or inside cracks.
5.1 Masking the Emerald
- Use a liquid latex or acrylic nail polish. Apply 2–3 coats with a fine brush, covering the entire emerald and the bezel/prongs – but not the surrounding silver (since gold must adhere to the setting edge).
- Also mask the inside of the clasp mechanism to avoid gold galling.
- Allow to dry 30 minutes.
5.2 Surface Preparation for Plating
- Degrease: Ultrasonic in alkaline degreaser (pH 11) at 60°C for 3 min.
- Activation: Dip in 10% sulfuric acid for 30 seconds, then rinse in distilled water.
- Optional nickel underlayer: A 1–2 µm bright nickel plate improves gold adhesion and prevents silver migration. Use a sulfamate nickel bath at 50°C, 2–4 A/dm² for 5 min.
5.3 Gold Plating Bath Composition (Cyanide-based – professional use)
- Gold potassium cyanide: 8–12 g/L (as metallic gold).
- Potassium cyanide: 15–20 g/L.
- Brighteners: cobalt or nickel salts (e.g., 0.1 g/L cobalt carbonate).
- pH: 10.5–11.0.
- Temperature: 55–60°C.
- Anode: Stainless steel or platinum-coated titanium (inert anode).
- Current density: 0.5–1.0 A/dm².
5.4 Plating Process
- Connect bracelet to cathode (titanium hook or clip).
- Immerse fully, ensuring no air bubbles trapped under masking.
- Plate for 40–60 minutes to achieve 3–5 µm thickness.
Calculation: For 0.5 A/dm², silver surface area ~12 cm² → current = 0.6 A. Deposition rate ~0.1 µm/min at 100% efficiency → 30 min for 3 µm. - Agitate gently with magnetic stirrer or air sparger to avoid burning.
- Remove, rinse in distilled water.
5.5 Stripping Mask and Final Rinse
- Peel off latex mask with fine tweezers.
- Rinse in warm running water.
- Neutralize cyanide residue in 3% hydrogen peroxide + dilute acetic acid bath for 2 minutes, then triple rinse.
5.6 Non-Cyanide Plating Alternative
For small workshops: Use proprietary non-cyanide gold sulfite bath (e.g., Technic 25S).
- Safer, pH 8.5–9.5, temperature 45–50°C.
- Thickness limited to ~2 µm without nickel underlayer. Acceptable but less durable.
Part 6: Final Finishing and Quality Control
6.1 Polishing the Gold Vermeil Layer
- Do not use rouge or Tripoli directly on gold vermeil – it will abrade the thin gold layer.
- Use a soft bristle brush with mild soap and water to remove any remaining latex residue.
- For high luster: Gently polish with a gold polishing cloth (non-abrasive, impregnated with mild cleaner).
- Never use an ultrasonic cleaner after gold plating – it can cause delamination.
6.2 Applying Anti-Tarnish Coating
- Spray or dip in a water-based organic coating (e.g., ProtectaClear) to prevent silver sulfide tarnish from bleeding through microscopic gold pores.
- Cure at 60°C for 20 minutes.
6.3 Inspection Checklist
| Parameter | Acceptable Range | Test Method |
|---|---|---|
| Gold thickness | ≥2.5 µm (min), 3–5 µm ideal | XRF analyzer (e.g., Fischerscope) |
| Emerald carat weight | 0.30 ct ± 0.02 ct | Precision scale + gemological gauge |
| Engraving depth | 0.1–0.25 mm | Optical microscope + depth gauge |
| Adhesion (gold to silver) | No peeling after tape test | 3M tape applied and ripped |
| Tarnish resistance | No discoloration after 24h in H₂S chamber | Humidity chamber with ammonium sulfide |
| Stone security | No movement at 500g force | Push test with calibrated probe |
| Overall finish | Bright cut highlights, no scratches | 10× loupe inspection |
6.4 Packaging
- Insert bracelet into a soft anti-tarnish flannel pouch.
- Include a certificate of authenticity stating: 925 silver base, 18K gold vermeil (3 µm), 0.3 ct green emerald (natural or lab-created).
- Store in a closed, humidity-controlled box (30–40% RH).
Part 7: Troubleshooting Common Defects
| Defect | Probable Cause | Solution |
|---|---|---|
| Gold plating peels | Poor degreasing or missing nickel strike | Strip (cyanide stripper), re-polish silver, re-plate |
| Emerald cracks during setting | Bezel too small or hammer blow | Replace stone; use bezel rocker, never mallet |
| Engraving looks dull | Graver not polished or wrong rake angle | Re-sharpen with 45° face, 15° heel; burnish lines |
| Star rays uneven | Inconsistent hand pressure | Practice on copper; use graver with heel length control |
| Green tint on gold plate | Copper from silver alloy migrated | Increase nickel barrier layer to 2 µm |
| Scratching of emerald at final polish | Abrasive paste entered setting | Remask; use disposable brushes for final cleaning |
Conclusion
Producing an engraved Northern Star bracelet with a 0.3ct green emerald in gold vermeil is a multi-stage process requiring disciplined execution of silversmithing, engraving, gemology, and electroplating. The reward is a celestial-inspired piece that balances symbolic artistry with durable luxury. Key success factors include:
- Meticulous masking of the emerald before plating.
- Achieving bright, deep engraving through properly sharpened gravers.
- Controlling gold thickness to meet vermeil standards.
- Rigorous final inspection to ensure stone security and tarnish resistance.
Whether fabricated as a single bespoke commission or scaled to 500 units, this production protocol ensures each bracelet carries the precision of a navigational instrument and the warmth of a guiding star. By honoring both ancient engraving traditions and modern electroplating science, the final product is not just jewelry – it is a handheld constellation.
Over the last 23 years, JINGYING Jewelry has been providing a one-stop solution for brand jewelers in terms of OEM/ODM and customized work. We can create a great art jewelry collection in fine jewelry making using just your thoughts, photos, or CAD designs.
We provide ODM/OEM services for 100% real gold and 925 sterling silver rings, necklaces, pendants, earrings, bracelets, and pearl jewelry, including rings, sterling silver cross necklaces, heart necklaces, white gold earrings, and gold tennis bracelets, with personalized logos and packaging.
