The Artisan’s Journey: A Step-by-Step Guide to Designing a 925 Silver Necklace
The creation of a piece of jewelry, particularly a custom-designed 925 silver necklace, is a fascinating alchemy of art, science, and storytelling. It transcends mere adornment, becoming a wearable expression of identity, memory, or love. Unlike mass-produced pieces found in chain stores, a custom necklace is born from a collaborative journey between a client and a jeweler (or a designer and their own vision). This process transforms an abstract idea, a fleeting sketch, or a cherished sentiment into a tangible, polished object of beauty and value.
This article will serve as your definitive guide, meticulously deconstructing the entire process of designing a sterling silver necklace from the initial spark of inspiration to the final, gleaming piece presented in its box. We will explore each phase in depth, covering the creative, technical, and practical considerations that define the art of custom jewelry design.
Phase 1: The Genesis – Inspiration and Conceptualization
Every great design begins with an idea. This phase is about gathering raw inspiration and defining the core concept of the necklace.
Step 1: Sourcing Inspiration
Inspiration is omnipresent. It can be found in:
- Nature: The organic swirl of a nautilus shell, the delicate veins of a leaf, the rugged texture of bark, the form of a feather or a flower.
- Architecture: The geometric patterns of Art Deco, the sweeping curves of Art Nouveau, the stark minimalism of modernism.
- Art & History: Motifs from ancient civilizations (Celtic knots, Egyptian symbols, Greek meanders), the color palettes of a favorite painting, or the aesthetic of a historical era (Victorian, Renaissance).
- Personal Meaning: Coordinates of a significant location, the initials of a loved one, the reinterpretation of a broken heirloom, a symbol that represents a personal journey (a compass for direction, a tree for growth).
- Pure Abstraction: A focus on form, texture, and light rather than a representational object.
Actionable Tip: Create a “mood board.” This can be a physical board with magazine clippings, sketches, and fabric swatches, or a digital one using platforms like Pinterest. Collect images of necklaces you like, but also include photos of textures, landscapes, colors, and art that evoke the feeling you want your necklace to convey.
Step 2: Defining the “Why” and the “Who”
Before putting pencil to paper, answer these foundational questions:
- Who is it for? Is it for yourself or a gift? Understanding the wearer’s personality, style (minimalist, bohemian, classic, avant-garde), and lifestyle (active, professional, formal) is crucial.
- What is the occasion? A wedding, an anniversary, a birthday, or a daily wearable piece? This influences the design’s complexity and grandeur.
- What is the budget? Establishing a realistic budget early on guides material choices (e.g., will there be gemstones?), size, and complexity. Custom silver jewelry can range from under $200 for a simple piece to several thousand for a complex, gemstone-heavy design.
- What is the timeline? A custom piece is not instant. A typical process can take anywhere from 4 to 12 weeks. Plan accordingly.
Phase 2: The Blueprint – Design and Documentation
This is where the nebulous idea begins to take a concrete form. It involves sketching, making material decisions, and creating technical plans.
Step 3: Preliminary Sketching
Start with loose, freehand sketches. Don’t aim for perfection; aim for exploration. Use a soft pencil to play with shapes, proportions, and layouts.
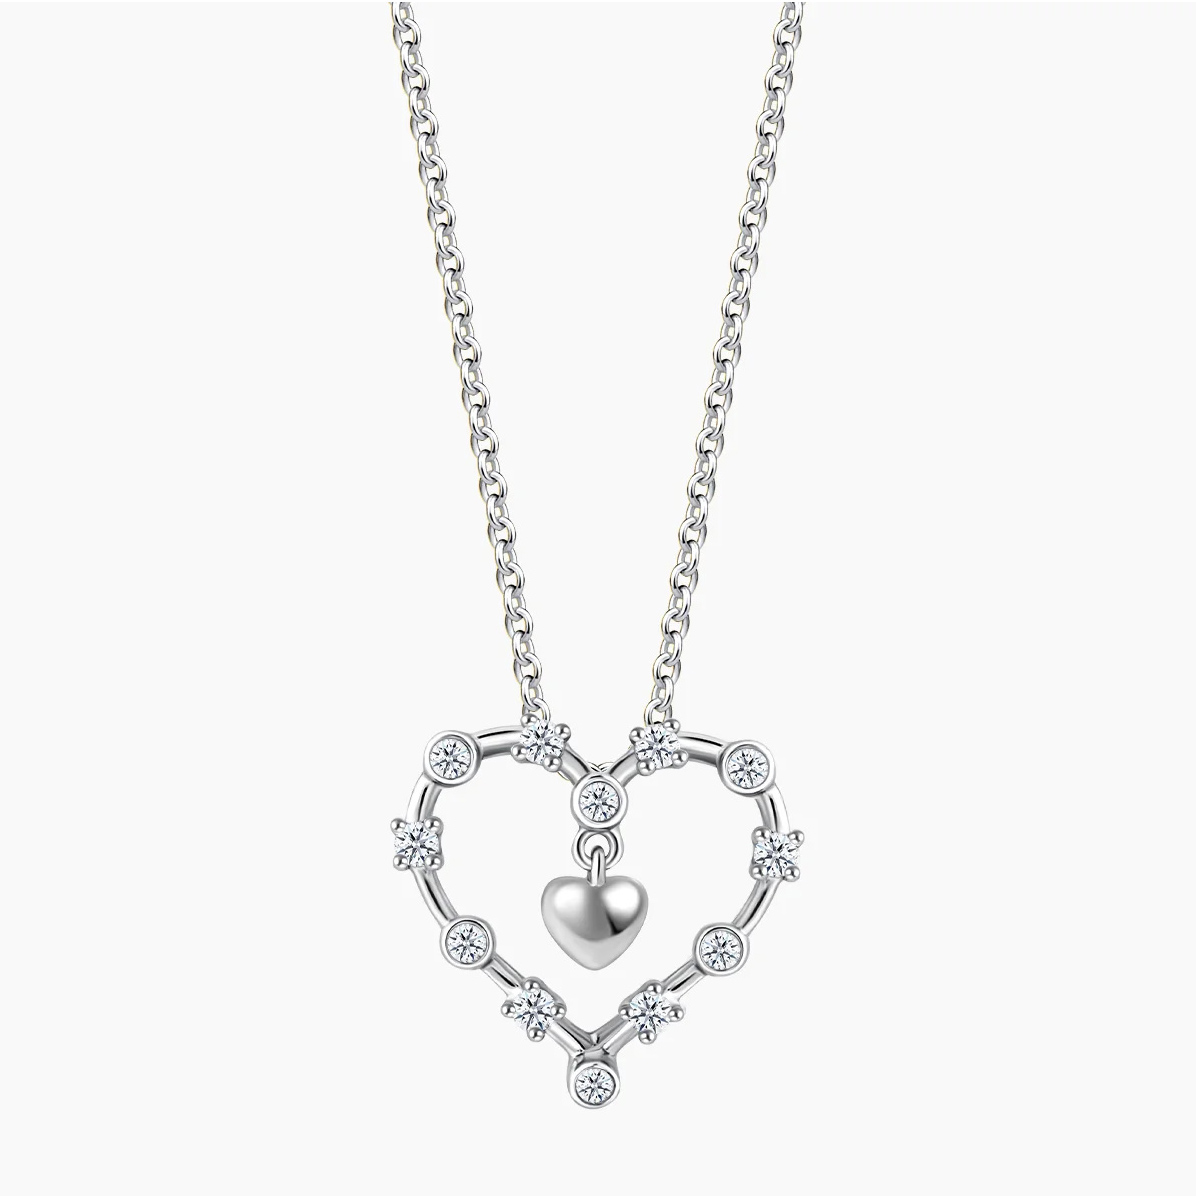
- Focus on the Pendant: The pendant is often the focal point of a necklace. Sketch various iterations of your central motif.
- Consider the Chain: The chain is not just a functional element; it’s an integral part of the design. How does its style (e.g., delicate cable, bold figaro, textured rolo) complement the pendant? Should it be a simple bail or an integrated part of the design?
- Think in 3D: Remember that jewelry is worn. Sketch side views to conceptualize depth and how the piece will lie against the body.
Step 4: Material and Technical Specification
Now, define the physical attributes of your design.
- Metal: You’ve chosen 925 Sterling Silver. Understand its properties: it’s durable yet malleable, has a brilliant white luster, and will tarnish over time but can be easily polished. Decide if you want a different fineness (e.g., 950 Argentium Silver for higher tarnish resistance) for certain components.
- Gemstones (Optional): If your design includes stones, you must select them.
- Type: Diamonds, sapphires, and amethysts are popular. Consider less traditional options like moonstone, labradorite, or topaz.
- Cut: The shape of the stone (round brilliant, oval, pear, cabochon) dramatically affects the design’s aesthetic.
- Size and Placement: How many stones? Will they be a central feature or accent stones?
- Findings: These are the functional components: the clasp (lobster claw, spring ring, magnetic, hook-and-eye), jump rings, and the bail. Their style and size must be chosen to match the design’s weight and aesthetic.
Step 5: Technical Drawing and CAD Modeling
For anything beyond the simplest design, a technical drawing is essential. In the modern jewelry workshop, this is almost always done using Computer-Aided Design (CAD) software.
- The Process: A CAD designer uses software like RhinoGold or Matrix to create a precise 3D digital model of your necklace.
- Advantages of CAD:
- Precision: Every dimension is exact, ensuring settings for stones are perfect and components fit together.
- Visualization: The software can generate photorealistic renderings, showing you exactly what the piece will look like in silver, often with realistic stone settings. This allows for approval before any physical metal is used.
- Modification: Changes are infinitely easier to make in a digital file than on a physical model.
- Weight Calculation: The software can calculate the exact weight of silver required, which is crucial for costing.
- The Deliverable: You will receive renderings from multiple angles to review and approve. This is the final blueprint for production.
Phase 3: The Foundation – Model Making and Prototyping
How do we bridge the gap between a digital file and a silver object? This is achieved through prototyping.
Step 6: Creating the Physical Model
The approved CAD file is used to create a physical model of the necklace’s pendant and any other unique elements (the chain is usually sourced pre-made unless it’s custom too). There are two primary methods:
- 3D Printing (Stereolithography – SLA): This is the industry standard. The CAD file is sent to a high-resolution 3D printer that uses a UV-sensitive liquid resin. A laser solidifies the resin layer by microscopic layer, building a precise, hard plastic model of the design. This model captures every detail, including texture and undercuts.
- Hand-Carving (Less Common): A skilled model-maker can carve the design from a block of jeweler’s wax using specialized files and knives. This is a traditional art form and is often used for more organic, one-of-a-kind pieces where perfect symmetry is not desired.
This plastic or wax model is a perfect positive replica of your future silver pendant. It is often presented for a final check before the irreversible step of casting.
Phase 4: The Transformation – Casting the Silver
This is the stage where the model is transformed into sterling silver through the ancient and precise process of investment casting, also known as lost-wax casting.
Step 7: Spruing and Investing
- Spruing: The wax/resin model is attached to a wax “tree” with other models using wax rods called “sprues.” These sprues create channels for the molten metal to flow.
- Investing: The tree is placed inside a steel flask. A liquid investment plaster (a fine, heat-resistant gypsum) is mixed under vacuum to remove air bubbles and poured into the flask, encasing the entire tree. It is left to harden into a solid block.
Step 8: Burnout
The flask is placed in a kiln and heated to a high temperature (around 1300°F / 700°C). This process serves two purposes: it bakes the investment into a hard, ceramic shell, and it completely melts and vaporizes the wax/resin model, leaving behind a perfect, hollow negative cavity in the shape of your necklace components.
Step 9: Casting
- Melting: Precisely measured 925 silver grain is placed in a crucible within a casting machine.
- Pouring: The silver is melted with a torch or induction heater until it is a molten, glowing liquid. The hot flask is quickly taken from the kiln and secured in the casting machine. The machine uses centrifugal force or vacuum pressure to force the liquid silver into the empty cavity of the flask at high speed, filling every intricate detail of the mold.
Step 10: Cooling and Devesting
The flask is left to cool. Once cool, it is plunged into water, causing the brittle investment plaster to break apart—a process called “devesting.” The metal tree, now solid silver, is revealed. The individual silver pieces (called “castings”) are cut from the central sprue using a jeweler’s saw.
The result is a raw, unfinished silver version of your design. It will have a matte, slightly grainy surface texture and will still have the sprues attached where it was connected to the tree.
Phase 5: The Revelation – Finishing and Assembly
This is the most labor-intensive phase, where the rough casting is transformed into a polished piece of jewelry. This is where the jeweler’s skill truly shines.
Step 11: Pre-Finishing (Fettling)
- Removing Sprues: The sprues are carefully sawed off.
- Filing and Sanding: All rough edges, casting seams, and saw marks are meticulously filed down. The piece is then sanded with progressively finer grits of sandpaper (from coarse to very fine) to smooth the surface. This is done entirely by hand and requires a keen eye.
Step 12: Tumbling
The piece is placed in a tumbling machine—a barrel filled with small steel shot, water, and burnishing compound. As the barrel rotates for several hours, the shot work-hardens the silver, polishes it to a preliminary shine, and smooths out any tiny scratches from sanding.
Step 13: Stone Setting (If applicable)
If your design includes gemstones, a highly specialized jeweler, the setter, now does their work. Using micro-burs, gravers, and precision tools, they cut seats into the metal and secure the stones. Common setting styles for silver necklaces include:
- Prong Setting: Metal claws hold the stone. Classic and brilliant.
- Bezel Setting: A strip of metal surrounds the girdle of the stone, securing it. Modern and secure.
- Channel Setting: Stones are set into a channel between two metal walls. Often used for accent stones.
- Pave Setting: Many small stones are set very close together, creating a “paved” surface of brilliance.
Step 14: Polishing and Finishing
This step defines the final look and feel of the silver.
- Polishing: The piece is polished on a motorized wheel with muslin buffs charged with polishing compounds. It starts with a coarser compound (Tripoli) to remove scratches and ends with a fine polishing compound (rouge) to achieve a brilliant, mirror-like shine.
- Texturing: If the design calls for a matte or textured finish, it is applied now.
- Matte/Satin Finish: Created by brushing the surface with a wire brush or sandblasting it with fine glass beads.
- Oxidization: A chemical solution (liver of sulfur) is used to darken the silver, blackening the recesses and crevices to create dramatic contrast and highlight the details (this is called “antiquing”). The high points are then polished back to bright silver.
Step 15: Assembly
The various components are assembled. The pendant is attached to the chosen chain via a jump ring and bail. The clasp is attached to the ends of the chain. All connections are checked for security.
Phase 6: The Finale – Quality Control and Presentation
The journey concludes with rigorous checks and the joyful presentation of the finished piece.
Step 16: Quality Control
The jeweler conducts a final, meticulous inspection under magnification:
- Structural Integrity: Are all solders clean and strong? Are the prongs tight and secure?
- Stone Security: Is every stone firmly set without any movement?
- Finish: Is the polishing even and flawless? Is the desired texture consistent?
- Function: Does the clasp open and close smoothly?
Step 17: Ultrasonic Cleaning and Final Prep
The necklace is placed in an ultrasonic cleaner, which uses high-frequency sound waves in a cleaning solution to remove every last trace of polishing compound, dust, and fingerprints. It is then steamed dried, giving it a final, brilliant luster.
Step 18: Packaging and Delivery
The necklace is carefully placed in a presentation box, often lined with anti-tarnish material. It is now ready to be delivered to its owner, accompanied by care instructions that typically advise storing it in a dry place, avoiding contact with chemicals (perfume, chlorine), and cleaning it with a special polishing cloth to maintain its shine.
Conclusion
Designing and creating a 925 silver necklace is a profound process of creation. It is a journey that moves from the abstract realms of inspiration and emotion through the precise disciplines of design and engineering, and finally into the tactile, skilled world of craftsmanship. Each step, from the first sketch to the final polish, is imbued with intention and expertise. The resulting piece is far more than an accessory; it is a wearable story, a unique artifact that embodies a vision and carries a personal significance that no mass-produced item can ever hope to replicate. It is a testament to the enduring power of human creativity and skill.