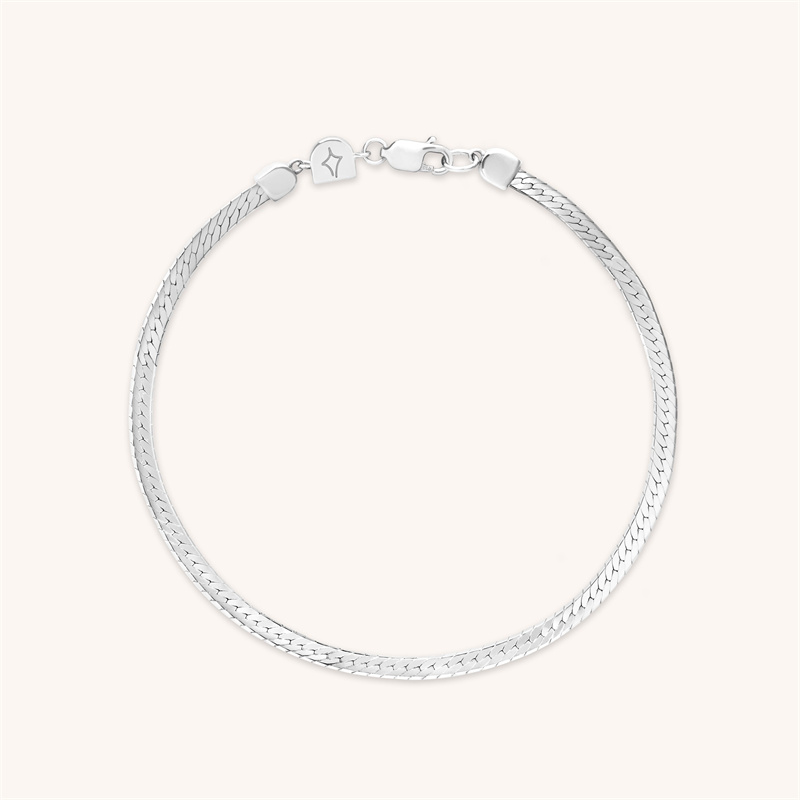
The Art of the Serpent: A Comprehensive Guide to Crafting a Silver-Plated Copper Snake Chain Bracelet
The snake chain, with its sleek, interlocking scales and fluid, serpentine movement, is a timeless piece of jewelry. Its name is derived from its intricate design, which closely resembles the scales and flexible spine of a snake. Achieving a perfect, high-quality snake chain through traditional silversmithing is a complex and expensive endeavor, reserved for master craftsmen. However, the technique of silver-plating offers a brilliant alternative, allowing for the creation of a stunning, luxurious-looking bracelet that is both affordable and achievable with meticulous effort.
This article provides an exhaustive, step-by-step guide to creating a silver-plated copper snake chain bracelet. We will delve deep into the materials, the science of electroplating, the detailed fabrication process, and the crucial finishing touches that transform base metals into a piece of elegance.
Part 1: Understanding the Components and Principles
1.1 What is a Snake Chain?
A snake chain is not a chain in the traditional sense of interlocking links. Instead, it is constructed from a series of precisely cut, curved metal “beads” or links that are connected and then wound around a flexible, wire-rope core. Each bead has a concave and convex side, allowing them to fit together perfectly, creating a continuous, smooth, and flexible tube. When executed correctly, the chain has no visible seams and moves with a unique, slinky grace.
1.2 The Rationale for Copper and Silver-Plating
- Copper as the Base Metal: Copper is the ideal choice for the base metal for several reasons. It is highly malleable and ductile, allowing it to be formed into the intricate shapes required for the chain links. It is an excellent conductor of electricity, a critical property for the electroplating process. Furthermore, it is significantly less expensive than sterling silver, making it a cost-effective core material.
- Silver-Plating for Finish and Value: Electroplating deposits a thin layer of pure silver onto the copper surface. This gives the bracelet the exact appearance, luster, and feel of a solid silver piece. Pure silver (999 fine) is even brighter and more hypoallergenic than sterling silver (925 fine), though the underlying copper means it is not suitable for those with severe copper allergies if the plating wears through.
1.3 The Science of Electroplating
Electroplating is an electrochemical process where metal cations in a solution are reduced and deposited onto a conductive substrate as a thin, solid layer. The process requires:
- An Anode: The source of the metal to be plated. In this case, a pure .999 fine silver sheet or rod.
- A Cathode: The object to be plated—the cleaned and prepared copper snake chain.
- An Electrolyte Solution: A solution containing ions of the metal to be deposited. Here, a silver cyanide-based or silver nitrate-based solution is used. (Note: Cyanide-based solutions are extremely hazardous and require professional handling; we will focus on a safer, albeit more complex, alternative later).
- Direct Current (DC) Power Source: Provides the electron flow needed to reduce the silver ions onto the cathode.
Part 2: Tools, Equipment, and Safety Gear
SAFETY FIRST: This process involves hazardous chemicals, fumes, and high temperatures. You MUST work in a well-ventilated area, preferably a fume hood. Always wear appropriate Personal Protective Equipment (PPE):
- Chemical-resistant gloves (nitrile or neoprene)
- Safety goggles or a face shield
- A lab coat or apron
- A respirator mask with vapor filters when handling acids and plating solutions
2.1 Fabrication Tools:
- Jeweler’s Saw & Blades: (Size 4/0 or 3/0) for precise cutting.
- Bench Pin & Vise: To hold the work steady while sawing.
- Metal Files: (Flat, half-round, and needle files) for smoothing edges.
- Sandpaper & Polishing Papers: (Various grits from 220 to 1200).
- Mandrels: (Round and oval) for forming the links.
- Rawhide or Delrin Mallet: For hammering without marring the metal.
- Soldering Torch: (Butane or propane) for soft soldering.
- Easy, Medium, and Hard Solders: (Silver solder wire).
- Flux: (Borax-based or commercial paste flux).
- Pickling Solution: (Hot diluted sulfuric acid or safe pickle substitute like “Sparex”).
- Pickling Pot: (A slow cooker dedicated to this purpose).
- Copper Tweezers: For handling hot and pickled metal.
- Flexible Shaft Machine or Dremel: With polishing attachments.
- Steel Block: For planishing and hardening.
2.2 Plating Equipment & Chemicals:
- DC Power Supply/Rectifier: (0-12 volts, 0-2 amps adjustable).
- Alligator Clips & Wires: (Copper).
- Plating Tank: (Glass or plastic beaker, 1000ml+).
- Anode: .999 Fine Silver sheet or wire.
- Cathode Hanger: (A copper wire to suspend the chain).
- Electrolyte Solution: We will use a Non-Cyanide Silver Plating Solution (e.g., a solution based on silver nitrate and potassium cyanide-free complexing agents). These are commercially available from jewelry suppliers and are significantly safer for studio use.
- Degreasing Solution: (A commercial electrocleaner or a hot solution of TSP – Trisodium Phosphate).
- Activation Solution: (A 10% solution of Sulphuric Acid).
- Distilled Water: For all rinsing steps.
- Multiple Glass Beakers: For the various solutions and rinse baths.
Part 3: The Step-by-Step Fabrication Process
Phase 1: Designing and Cutting the Links
- Design: The first step is to determine the desired width and length of your bracelet. A standard width is 3-4mm. For a 7-inch bracelet, you will need approximately 100-120 individual links, depending on their size.
- Sheet Preparation: Cut a strip of 20-22 gauge (0.8-0.6mm) copper sheet. The width of the strip should be exactly the desired width of your finished chain (e.g., 3mm).
- Cutting the Links: Using the jeweler’s saw, cut the copper strip into tiny, equal-length pieces. These pieces will look like tiny rectangles. The length of each rectangle determines the “grain” of the chain; shorter pieces create a finer, more flexible chain. A good starting length is 1.5 to 2 times the width (e.g., for a 3mm wide strip, cut 4.5-6mm long pieces). This is incredibly meticulous work and requires a steady hand.

Phase 2: Forming the “Beads”
- Filing: De-burr all the cut pieces using a needle file to remove any sharp edges.
- Annealing: Heat the copper pieces evenly with your torch until they glow a dull red, then quench them in water. This process (annealing) softens the copper, which has hardened from being worked (cut), making it easier to form.
- Forming: This is the most critical step. Take each tiny rectangle and, using half-round needle files and a mandrel, carefully file and form each piece into a slight, smooth curve. The goal is to make each piece a segment of a tube. The outside becomes the convex part of the scale, and the inside becomes the concave part. Consistency is key; every link must be identical.
Phase 3: Assembling the Core and First Links
- Preparing the Core: Cut a length of fine, flexible stainless steel or silver-plated copper wire rope (e.g., 7-strand core). This will be the internal structure that gives the chain its flexibility and strength.
- Soldering the First Set: This is the most challenging part of assembly. Arrange a small number of curved links (e.g., 5-6) in a row, with their curves aligned to form a short tube. They must fit together perfectly. Using a very small amount of easy solder and flux, carefully solder the seams where the links meet. The heat must be precise to flow the solder without melting the delicate copper links. This first soldered segment creates the “head” of the snake.
- Pickling: Once the first segment is soldered, place it in the warm pickle solution to remove all flux and oxidation residue. It will come out clean and pink.
Phase 4: Building the Chain
- Incremental Assembly: Slide the pickled segment onto the core wire. Now, take the next set of links, fit them around the core, and carefully solder their seams. Continue this process, periodically sliding the newly soldered sections down the core wire.
- Work Hardening and Planishing: As you work, the copper will become soft (annealed). To maintain the chain’s structure and strength, gently planish (hammer lightly) the assembled sections on a steel block using a rawhide mallet. This hardens the metal and ensures a smooth, uniform surface.
- Final Soldering: Continue until the entire core wire is covered, leaving a small amount of core at each end for the clasp assembly. The final segment is the “tail.”
Phase 5: Finishing the Metal Pre-Plating
- Initial Sanding: Once fully assembled, the chain will have solder seams and minor imperfections. Using progressively finer grits of sandpaper (starting at 400, moving to 800), sand the entire chain until it is completely smooth. All seams must be invisible to the touch and eye.
- Polishing: Use a polishing motor with a muslin wheel and a coarse polishing compound (like Tripoli) to begin the polishing process. This removes the sanding scratches and brings up a shine on the copper.
- Final Pre-Plating Polish: Switch to a clean wheel and a finer polishing compound (like Zam). Polish the chain to a mirror-bright finish. The quality of your plating is directly dependent on the quality of this polish. Any scratch or flaw will be visible under the silver layer.
Part 4: The Electroplating Process
Phase 6: Preparation for Plating
- Ultra-Cleaning (Degreasing): Any oil, grease, or polish residue will prevent the silver from adhering. Submerge the chain in the hot degreasing solution (following product instructions) for 2-3 minutes. Handle it only with gloves from this point forward.
- Rinsing: Immediately and thoroughly rinse the chain in a beaker of distilled water. Do not touch it with bare hands.
- Activation (Acid Dip): Dip the chain into the 10% sulphuric acid solution for 15-30 seconds. This acid etch micro-roughens the surface and removes any last traces of oxide, ensuring a perfect molecular bond for the plating. It will leave the copper looking dull and pink.
- Final Rinse: Rinse again thoroughly in a second beaker of distilled water. The chain is now chemically clean and ready to plate.
Phase 7: The Plating Setup
- Prepare the Anode: Connect your pure silver anode to the positive (+) terminal of your power supply using an alligator clip and wire. Suspend it in the non-cyanide silver plating solution.
- Prepare the Cathode: Connect your copper cathode hanger wire to the negative (-) terminal. Suspend your clean, dry copper chain from this hanger, ensuring it is fully submerged in the solution and not touching the anode.
- Power Settings: For a decorative plating layer, a low current density is required. Set your power supply to between 0.1 and 0.5 Volts and a very low current (50-100 mA). A higher voltage/current will cause a fast, grainy, and dull deposit.
Phase 8: The Plating Bath
- Initiating Plating: Turn on the power. You will likely see small bubbles forming on the cathode (your chain)—this is hydrogen gas being released. A smooth, slow deposition is key.
- Agitation: Gently and continuously agitate the cathode hanger to ensure a even flow of silver ions to all parts of the chain. This prevents “burning” (a dark, coarse deposit in high-current areas) and ensures a uniform plate.
- Timing: The plating time depends on the desired thickness. For a good-quality decorative layer that will last with careful wear, plate for 45 to 90 minutes. Monitor the process closely. The chain will slowly transform from a dull pink to a bright, shiny silver.
Phase 9: Post-Plating Rinse and Dry
- Rinse: Once the plating time is complete, turn off the power. Remove the chain from the plating solution and immediately rinse it thoroughly in a beaker of fresh distilled water to stop the chemical reaction.
- Drying: Pat the chain dry gently with a clean, lint-free cloth. Do not rub aggressively.
Part 5: Final Assembly and Protection
Phase 10: Attaching the Clasp
- Choosing a Clasp: Select a sterling silver or silver-plated clasp, such as a lobster clasp or a toggle clasp.
- Soldering Jump Rings: Using pre-made silver jump rings or making your own, attach the jump rings to the core wire exposed at each end of the chain. Use hard solder for strength. This must be done quickly and with localized heat to avoid damaging the plating on the adjacent chain. A heat sink (a clip holding a damp piece of cloth) can be placed next to the soldering area to draw heat away from the plated chain.
- Pickling and Final Rinse: Pickle the soldered jump rings, then give the entire bracelet a final, gentle rinse in distilled water and dry.
Phase 11: Final Polishing and Sealing
- Light Polishing: Use a very soft, clean polishing wheel (a dedicated loose-leaf wheel is ideal) with a fine rouge compound to give the plated surface a final, brilliant luster. Be extremely gentle to avoid wearing through the thin silver layer.
- Applying a Protective Lacquer (Optional): To drastically increase the tarnish resistance and durability of the plating, you can apply a thin coat of clear, anti-tarnish jewelry lacquer. Dip the bracelet, hang it to dry in a dust-free environment, and allow it to cure fully. Note: This will change the feel of the metal slightly and is not always desirable for high-end pieces.
Conclusion: The Reward of Meticulous Craft
Creating a silver-plated copper snake chain bracelet is a project that demands patience, precision, and a respect for both traditional craftsmanship and modern chemistry. It is a symphony of precise metalworking, meticulous soldering, and controlled electrochemistry. The result, however, is immensely rewarding. You are left with a beautiful, professional-looking piece of jewelry that you created from raw materials. The sleek, cool feel of the silver-plated chain and its captivating movement are a direct result of the care invested in every single step, from the first cut of the copper sheet to the final moment it emerges, gleaming, from the plating bath. This process is a true testament to the art and science of jewelry making.